FXML with Scene Builder: filling the stage
In the previous article I explained Stages and Scenes of JavaFX applications. However, when it to came to filling the stage with life I only used dummy content. This article explains how to visually design the actual content of a Stage with FXML and Scene Builder.
JavaFX Markup Language
I won’t go into the details of FXML in this article, because I feel it is quite intuitive when reading it. On the other hand, for producing FXML I introduce you to the Scene Builder below.
You can find the official introduction on Oracle’s website.
FXML essentially is like XML and can be used to define the scenegraph (i. e. the hierarchy of controls) without writing a single line of code. This helps with separating presentation logic from interface design. There’s three major things you need to know about FXML to get started, although FXML can do a lot more, for instance including other FXML files.
Using a controller for your view
Normally your view will consist of a container control (listed under Container in Scene Builder) used to define in which way its children are laid out. This outermost container holds the controller definition like in the following snippet:
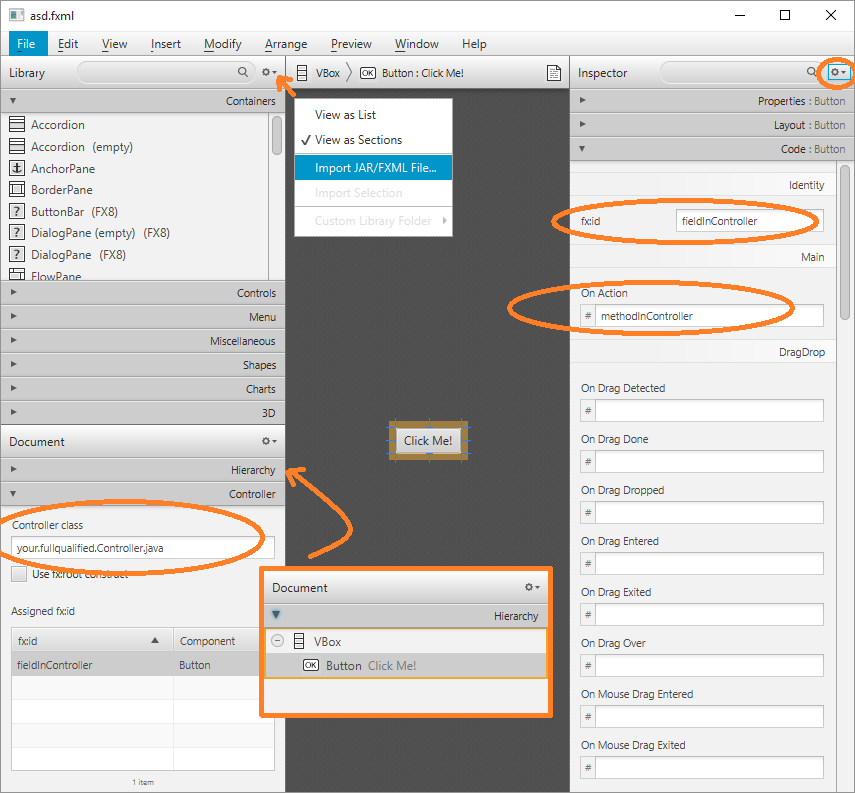
<VBox [...] fx:controller="de.omilke.ollifx.fxml.Controller">
    [...]
</VBox>
Binding controls and listeners to your controller
But what is this controller supposed to do?
On the one hand this class provides implementations for your action listeners, for instance the listener for clicking a button
via <Button text="Click Me!" onAction="#methodInController" />. As stated before, this is what separates presentation logic from interface
declaration.
On the other hand the controller can be injected the controls you use in your view via <Button text="Click Me!" fx:id="fieldInController"/>, which
enables you to initialize your control programmatically.
Essential demo files
sample.fxml
<?xml version="1.0" encoding="UTF-8"?>

<?import javafx.scene.control.Button?>
<?import javafx.scene.layout.VBox?>

<VBox xmlns="http://javafx.com/javafx/8.0.40" xmlns:fx="http://javafx.com/fxml/1"
      prefHeight="400.0"
      prefWidth="600.0"
      fx:controller="de.omilke.ollifx.fxml.Controller">
    <children>
        <Button text="Button" fx:id="fieldInController" onAction="#methodInController"/>
    </children>
</VBox>
Controller.java
package de.omilke.ollifx.fxml;

import javafx.event.ActionEvent;
import javafx.fxml.FXML;
import javafx.scene.control.Button;

public class Controller {

    @FXML
    private Button fieldInController;

    @FXML
    void methodInController(ActionEvent event) {

    }

    @FXML
    void initialize() {

    }

}
Loading FXML into the view
Unfortunately there’s no out-of-the-box-trick to insert your FXML into your stage, although it quite easy to process your FXML with FXMLLoader.load.
The following snippet shows how you can fill your stage with the FXML.
URL location = getClass().getResource("/sample.fxml");

Parent root = FXMLLoader.load(location);
primaryStage.setScene(new Scene(root, 300, 275));
primaryStage.setTitle("Hello FXML and Scene Builder");
primaryStage.show();
Demo Project
You can find the a demo project with everything put together on github.
Getting started with Scene Builder
Although the major Java IDEs provide syntax completion for FXML, the Scene Builder is of great help in designing the interface.
Originally the Scene Builder was maintained by Oracle, but recently Gluon took responsibility for maintaining Scene Builder and continue to provide as open source and for all platforms. In case you’re still using and old version, you should upgrade to Gluon’s version of Scene Builder.
Integrating Scene Builder with your IDE
Eclipse, Netbeans and IDEA each provide a setting to specify the location of the Scene Builder, which then enables you to directly open FXML files of your project with Scene Builder. The default installation location, at least in Windows 10, is a bit tricky though. You’ll find it under %USERPROFILE%\AppData\Local\SceneBuilder
Previewing
There is a preview function for the FXML you are working on. It basically loads your FXML into a default stage. This is really helpful, especially to check on the resize behaviour.
You can find it under Preview -> Show preview in Window or invoke it with STRG + P.
CSS Analyzer
When you plan to style your view with CSS, the CSS Analyzer provides a good overview of the different properties. It can list all properties defined in your view, including or excluding properties with default values. In more complex controls like a TreeTableView it also helps to find the style path. Just go ahead and try it yourself under View -> CSS Analyzer or with STRG + 6.

Sample Controller Skeleton
When you’ve finished designing your interface, you can view a controller skeleton, which contains all defined action listeners and fields annotated with an id. In fact, the demo controller I displayed above was generated with this function.
You can find it under View -> Show Sample Controller Skeleton.
Using custom controls
When using custom controls like FontawesomeFX, you need to import them into Scene Builder. Refer to the screenshot below to locate this slightly hidden feature. You can just point to the file of your .m2 directory.
However, you might need to re-import the file in Scene Builder when upgrading the version in your pom.xml.
Conclusion
The Scene Builder is a mighty tool. I definitely encourage you to give it a try and play a little to also discover the other features not mentioned here, for example in the upper right corner. You will quickly figure out how everything works in detail and conclude that this is a tool you will not want to miss anymore. By the way, there also is a Dark Theme you can select in the preferences.
